Routing & Navigation
This guide covers the router's primary features, illustrating them through the evolution of a small application that you can live example / download example .
Overview
The browser is a familiar model of application navigation:
- Enter a URL in the address bar and the browser navigates to a corresponding page.
- Click links on the page and the browser navigates to a new page.
- Click the browser's back and forward buttons and the browser navigates backward and forward through the history of pages you've seen.
The Angular
Router ("the router") borrows from this model. It can interpret a browser URL as an instruction to navigate to a client-generated view. It can pass optional parameters along to the supporting view component that help it decide what specific content to present. You can bind the router to links on a page and it will navigate to the appropriate application view when the user clicks a link. You can navigate imperatively when the user clicks a button, selects from a drop box, or in response to some other stimulus from any source. And the router logs activity in the browser's history journal so the back and forward buttons work as well.The Basics
This guide proceeds in phases, marked by milestones, starting from a simple two-pager and building toward a modular, multi-view design with child routes.
An introduction to a few core router concepts will help orient you to the details that follow.
Most routing applications should add a
index.html as the first child in the
If the
app folder is the application root, as it is for the sample application, set the href value exactly as shown here.Router imports
The Angular Router is an optional service that presents a particular component view for a given URL. It is not part of the Angular core. It is in its own library package,
@angular/router. Import what you need from it as you would from any other Angular package.import { RouterModule, Routes } from '@angular/router';
You'll learn about more options in the details below.
Configuration
A routed Angular application has one singleton instance of the
Router service. When the browser's URL changes, that router looks for a corresponding Route from which it can determine the component to display.
A router has no routes until you configure it. The following example creates four route definitions, configures the router via the
RouterModule.forRoot method, and adds the result to the AppModule's importsarray.const appRoutes: Routes = [
{ path: 'crisis-center', component: CrisisListComponent },
{ path: 'hero/:id', component: HeroDetailComponent },
{
path: 'heroes',
component: HeroListComponent,
data: { title: 'Heroes List' }
},
{ path: '',
redirectTo: '/heroes',
pathMatch: 'full'
},
{ path: '**', component: PageNotFoundComponent }
];
@NgModule({
imports: [
RouterModule.forRoot(
appRoutes,
{ enableTracing: true } // <-- debugging="" only="" purposes="" span="">
)
// other imports here
],
...
})
export class AppModule { }
The
appRoutes array of routes describes how to navigate. Pass it to the RouterModule.forRoot method in the module imports to configure the router.
Each
Route maps a URL path to a component. There are no leading slashes in the path. The router parses and builds the final URL for you, allowing you to use both relative and absolute paths when navigating between application views.
The
:id in the second route is a token for a route parameter. In a URL such as /hero/42, "42" is the value of the id parameter. The corresponding HeroDetailComponent will use that value to find and present the hero whose id is 42. You'll learn more about route parameters later in this guide.
The
data property in the third route is a place to store arbitrary data associated with this specific route. The data property is accessible within each activated route. Use it to store items such as page titles, breadcrumb text, and other read-only, static data. You'll use the resolve guard to retrieve dynamic data later in the guide.
The empty path in the fourth route represents the default path for the application, the place to go when the path in the URL is empty, as it typically is at the start. This default route redirects to the route for the
/heroes URL and, therefore, will display the HeroesListComponent.
The
** path in the last route is a wildcard. The router will select this route if the requested URL doesn't match any paths for routes defined earlier in the configuration. This is useful for displaying a "404 - Not Found" page or redirecting to another route.
The order of the routes in the configuration matters and this is by design. The router uses a first-match winsstrategy when matching routes, so more specific routes should be placed above less specific routes. In the configuration above, routes with a static path are listed first, followed by an empty path route, that matches the default route. The wildcard route comes last because it matches every URL and should be selected only if no other routes are matched first.
If you need to see what events are happening during the navigation lifecycle, there is the enableTracingoption as part of the router's default configuration. This outputs each router event that took place during each navigation lifecycle to the browser console. This should only be used for debugging purposes. You set the
enableTracing: true option in the object passed as the second argument to the RouterModule.forRoot() method.Router outlet
Given this configuration, when the browser URL for this application becomes
/heroes, the router matches that URL to the route path /heroes and displays the HeroListComponent after a RouterOutlet that you've placed in the host view's HTML.<router-outlet></router-outlet>
Router links
Now you have routes configured and a place to render them, but how do you navigate? The URL could arrive directly from the browser address bar. But most of the time you navigate as a result of some user action such as the click of an anchor tag.
Consider the following template:
template: `
Angular
Router
The
RouterLink directives on the anchor tags give the router control over those elements. The navigation paths are fixed, so you can assign a string to the routerLink (a "one-time" binding).
Had the navigation path been more dynamic, you could have bound to a template expression that returned an array of route link parameters (the link parameters array). The router resolves that array into a complete URL.
The
RouterLinkActive directive on each anchor tag helps visually distinguish the anchor for the currently selected "active" route. The router adds the active CSS class to the element when the associated RouterLink becomes active. You can add this directive to the anchor or to its parent element.Router state
After the end of each successful navigation lifecycle, the router builds a tree of
ActivatedRoute objects that make up the current state of the router. You can access the current RouterState from anywhere in the application using the Router service and the routerState property.
Each
ActivatedRoute in the RouterState provides methods to traverse up and down the route tree to get information from parent, child and sibling routes.Activated route
The route path and parameters are available through an injected router service called the ActivatedRoute. It has a great deal of useful information including:
| Property | Description |
|---|---|
url |
An
Observable of the route path(s), represented as an array of strings for each part of the route path. |
data |
An
Observable that contains the data object provided for the route. Also contains any resolved values from the resolve guard. |
paramMap |
An
Observable that contains a map of the required and optional parametersspecific to the route. The map supports retrieving single and multiple values from the same parameter. |
queryParamMap |
An
Observable that contains a map of the query parameters available to all routes. The map supports retrieving single and multiple values from the query parameter. |
fragment |
An
Observable of the URL fragment available to all routes. |
outlet |
The name of the
RouterOutlet used to render the route. For an unnamed outlet, the outlet name is primary. |
routeConfig |
The route configuration used for the route that contains the origin path.
|
parent |
The route's parent
ActivatedRoute when this route is a child route. |
firstChild |
Contains the first
ActivatedRoute in the list of this route's child routes. |
children |
Contains all the child routes activated under the current route.
|
Two older properties are still available. They are less capable than their replacements, discouraged, and may be deprecated in a future Angular version.
params—An Observable that contains the required and optional parameters specific to the route. Use paramMap instead.queryParams—An Observable that contains the query parameters available to all routes. Use queryParamMap instead.Router events
During each navigation, the
Router emits navigation events through the Router.events property. These events range from when the navigation starts and ends to many points in between. The full list of navigation events is displayed in the table below.| Router Event | Description |
|---|---|
NavigationStart |
An event triggered when navigation starts.
|
RoutesRecognized |
An event triggered when the Router parses the URL and the routes are recognized.
|
RouteConfigLoadStart | |
RouteConfigLoadEnd |
An event triggered after a route has been lazy loaded.
|
NavigationEnd |
An event triggered when navigation ends successfully.
|
NavigationCancel |
An event triggered when navigation is canceled. This is due to a Route Guard returning false during navigation.
|
NavigationError |
An event triggered when navigation fails due to an unexpected error.
|
These events are logged to the console when the
enableTracing option is enabled also. Since the events are provided as an Observable, you can filter() for events of interest and subscribe() to them to make decisions based on the sequence of events in the navigation process.Summary
The application has a configured router. The shell component has a
RouterOutlet where it can display views produced by the router. It has RouterLinks that users can click to navigate via the router.
Here are the key
Router terms and their meanings:| Router Part | Meaning |
|---|---|
Router | Displays the application component for the active URL. Manages navigation from one component to the next. |
RouterModule | A separate NgModule that provides the necessary service providers and directives for navigating through application views. |
Routes | Defines an array of Routes, each mapping a URL path to a component. |
Route | Defines how the router should navigate to a component based on a URL pattern. Most routes consist of a path and a component type. |
RouterOutlet | The directive (<router-outlet>) that marks where the router displays a view. |
RouterLink | The directive for binding a clickable HTML element to a route. Clicking an element with a routerLink directive that is bound to a string or a link parameters array triggers a navigation. |
RouterLinkActive | The directive for adding/removing classes from an HTML element when an associated routerLink contained on or inside the element becomes active/inactive. |
ActivatedRoute | A service that is provided to each route component that contains route specific information such as route parameters, static data, resolve data, global query params, and the global fragment. |
RouterState | The current state of the router including a tree of the currently activated routes together with convenience methods for traversing the route tree. |
| Link parameters array | An array that the router interprets as a routing instruction. You can bind that array to a RouterLink or pass the array as an argument to the Router.navigatemethod. |
| Routing component | An Angular component with a RouterOutlet that displays views based on router navigations. |
The sample application
This guide describes development of a multi-page routed sample application. Along the way, it highlights design decisions and describes key features of the router such as:
- Organizing the application features into modules.
- Navigating to a component (Heroes link to "Heroes List").
- Including a route parameter (passing the Hero
idwhile routing to the "Hero Detail"). - Child routes (the Crisis Center has its own routes).
- The
CanActivateguard (checking route access). - The
CanActivateChildguard (checking child route access). - The
CanDeactivateguard (ask permission to discard unsaved changes). - The
Resolveguard (pre-fetching route data). - Lazy loading feature modules.
- The
CanLoadguard (check before loading feature module assets).
The guide proceeds as a sequence of milestones as if you were building the app step-by-step. But, it is not a tutorial and it glosses over details of Angular application construction that are more thoroughly covered elsewhere in the documentation.
The full source for the final version of the app can be seen and downloaded from the live example / download example .
The sample application in action
Imagine an application that helps the Hero Employment Agency run its business. Heroes need work and the agency finds crises for them to solve.
The application has three main feature areas:
- A Crisis Center for maintaining the list of crises for assignment to heroes.
- A Heroes area for maintaining the list of heroes employed by the agency.
- An Admin area to manage the list of crises and heroes.
Try it by clicking on this Hero Employment Agency Live Example / download example .
Once the app warms up, you'll see a row of navigation buttons and the Heroes view with its list of heroes.

Select one hero and the app takes you to a hero editing screen.

Alter the name. Click the "Back" button and the app returns to the heroes list which displays the changed hero name. Notice that the name change took effect immediately.
Had you clicked the browser's back button instead of the "Back" button, the app would have returned you to the heroes list as well. Angular app navigation updates the browser history as normal web navigation does.
Now click the Crisis Center link for a list of ongoing crises.

Select a crisis and the application takes you to a crisis editing screen. The Crisis Detail appears in a child view on the same page, beneath the list.
Alter the name of a crisis. Notice that the corresponding name in the crisis list does not change.

Unlike Hero Detail, which updates as you type, Crisis Detail changes are temporary until you either save or discard them by pressing the "Save" or "Cancel" buttons. Both buttons navigate back to the Crisis Centerand its list of crises.
Do not click either button yet. Click the browser back button or the "Heroes" link instead.
Up pops a dialog box.
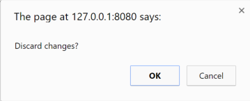
You can say "OK" and lose your changes or click "Cancel" and continue editing.
Behind this behavior is the router's
CanDeactivate guard. The guard gives you a chance to clean-up or ask the user's permission before navigating away from the current view.
The
Admin and Login buttons illustrate other router capabilities to be covered later in the guide. This short introduction will do for now.
Proceed to the first application milestone.
I like your post very much. It is very much useful for my research. I hope you to share more info about this. Keep posting angular js course
ReplyDeleteGood post and informative. Thank you very much for sharing this good article, it was so good to read and useful to improve my knowledge as updated, keep blogging.This article is very much helpful and i hope this will be an useful information for the needed one.Keep on updating these kinds of informative things
ReplyDeleteoracle training in chennai
oracle training institute in chennai
oracle training in bangalore
oracle training in hyderabad
oracle training
oracle online training
hadoop training in chennai
hadoop training in bangalore